
Container Workflows #
This guide will help you run your applications on LEXIS HPC infrastructure using containers. Whether you have a Python script with an AI application, a data processing tool, or any other program, this guide shows you how to package it and run it on powerful supercomputers.
Terminology:
Container: Your packaged application with all its dependencies
Workflow: A reusable template that defines how to run your container on HPC resources (see LEXIS Workflow)
Workflow Execution: An actual run of your workflow with specific parameters (see LEXIS Workflow Execution)
In this guide, you will learn how to package your application into a container, upload the container to LEXIS, run it on an HPC cluster and view the results. For a video tutorial on running AI containers on HPC clusters, see Demo videos.
Note
Before starting, make sure you are logged in to the LEXIS Portal at portal.lexis.tech and have access to a LEXIS project with assigned computation resources. If you need help with these prerequisites, see the appropriate sections of the How-to Guide.
Create Your Container#
Containers on the LEXIS platform are executed using APPTAINER on HPC clusters.
First, install Apptainer on your local machine by following the Apptainer Installation Guide. For most Linux distributions, you can install it via your package manager or download pre-built packages from the Apptainer website.
Once Apptainer is installed, you need a container definition file
that describes how to build the container image.
You can embed your application logic directly
in the definition file, or package it as a separate script.
In this example, we use a separate Python script to keep
things readable. Create a file app.py:
# app.py
import sys
import os
import numpy as np

# Get size from command line argument (default: 10)
size = int(sys.argv[1]) if len(sys.argv) > 1 else 10

# Generate data and compute statistics
data = np.random.rand(size, size)
mean_val = np.mean(data)

print(f"Generated {size}x{size} matrix. Mean: {mean_val:.6f}")

# Save result to output file if output directory exists
if os.path.exists("/mnt/output"):
    output_file = "/mnt/output/result.txt"
    with open(output_file, 'w') as f:
        f.write(f"Matrix size: {size}x{size}\nMean: {mean_val:.6f}\n")
    print(f"Results saved to {output_file}")
else:
    print("No output directory mounted - results not saved")
And modify the definition file to copy and run it:
Bootstrap: docker
From: ubuntu:22.04

%files
   # Copy your Python script into the container opt directory
    app.py /opt/app.py

%post
    apt-get update
    apt-get install -y python3 python3-pip
    pip3 install numpy

%runscript
    echo "Show input directory contents:"
    ls /mnt/input 2>/dev/null || echo "No input directory mounted"

    # Run the application with command-line arguments
    python3 /opt/app.py "$@"

    echo "Show output directory contents:"
    ls /mnt/output 2>/dev/null || echo "No output directory mounted"
The "$@" in the runscript passes all command-line arguments
to your Python script. Alternatively, you can use
python3 /opt/app.py --size $1 --output $2 if you want to
specify named parameters. Later during workflow you would
define the default parameters as “10 /mnt/output”
and override them during execution if needed.
Then build your container image:
apptainer build container.sif myapp.def
Note
The container file must be named container.sif for LEXIS usage.
Before uploading to the LEXIS Platform, it’s a good idea to test your container locally using bind mounts to simulate the input/output directories:
# Create local input and output directories
mkdir -p input output

# Run the container with bind mounts
apptainer run --bind ./input:/mnt/input --bind ./output:/mnt/output container.sif 5
This runs your container with a matrix size of 5
and saves the results to the local output/ directory.
The LEXIS Platform automatically handles these directory bindings for you.
For more detailed instructions on building containers, refer to the Apptainer Documentation.
Upload Container to LEXIS#
Once your container is ready, you need to upload it to the LEXIS Platform.
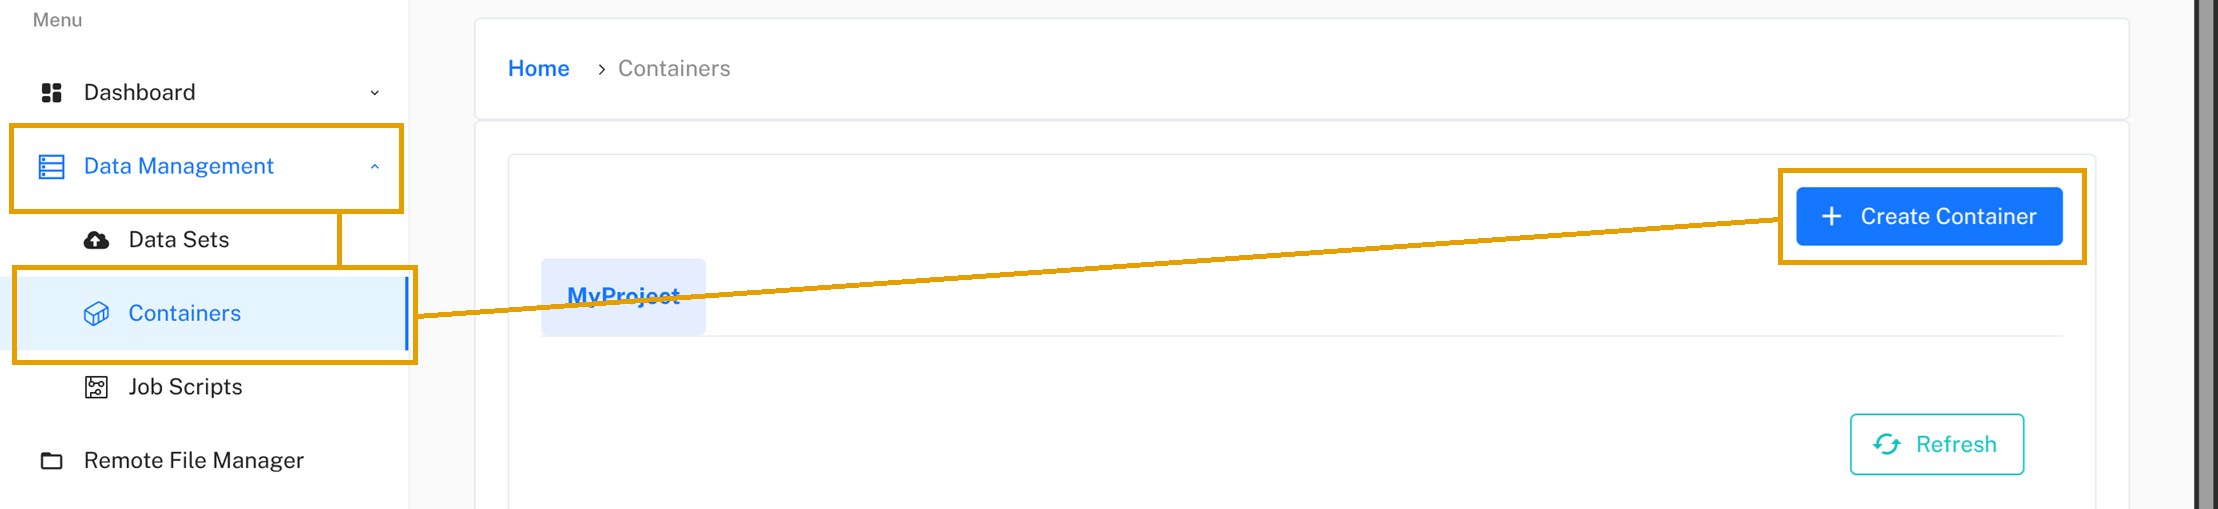
In the LEXIS Portal, go to Data Management/Containers in the navigation menu on the left and click on the Create Container button.
A form will appear. Select your container.sif file,
give your container a descriptive name (e.g., “My Python App”),
select the project to assign it to,
and set the access level. Click Continue.
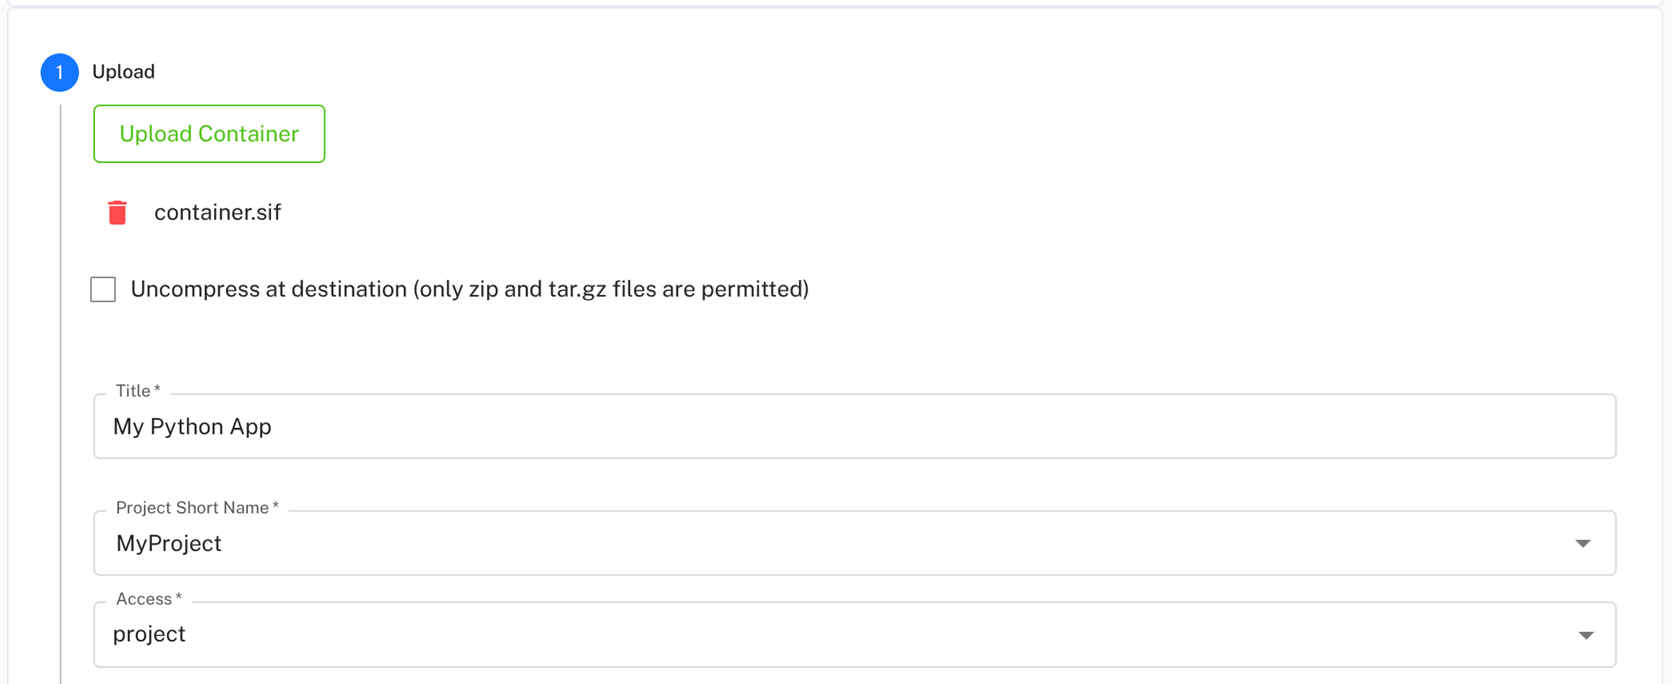
You will see a field for Default run arguments where you can specify default parameters for your container — you can leave this empty for now and set it later during workflow execution. Click Continue again to see a summary, review the details and click Upload.
The upload may take some time depending on the size of your container. Once completed, your container will appear in the list of available containers. It may take a few moments for it to be fully registered, so if you don’t see it immediately, give it a minute and refresh the page.
Create Container Workflow#
Now that your container is uploaded, you can create a workflow to execute it.
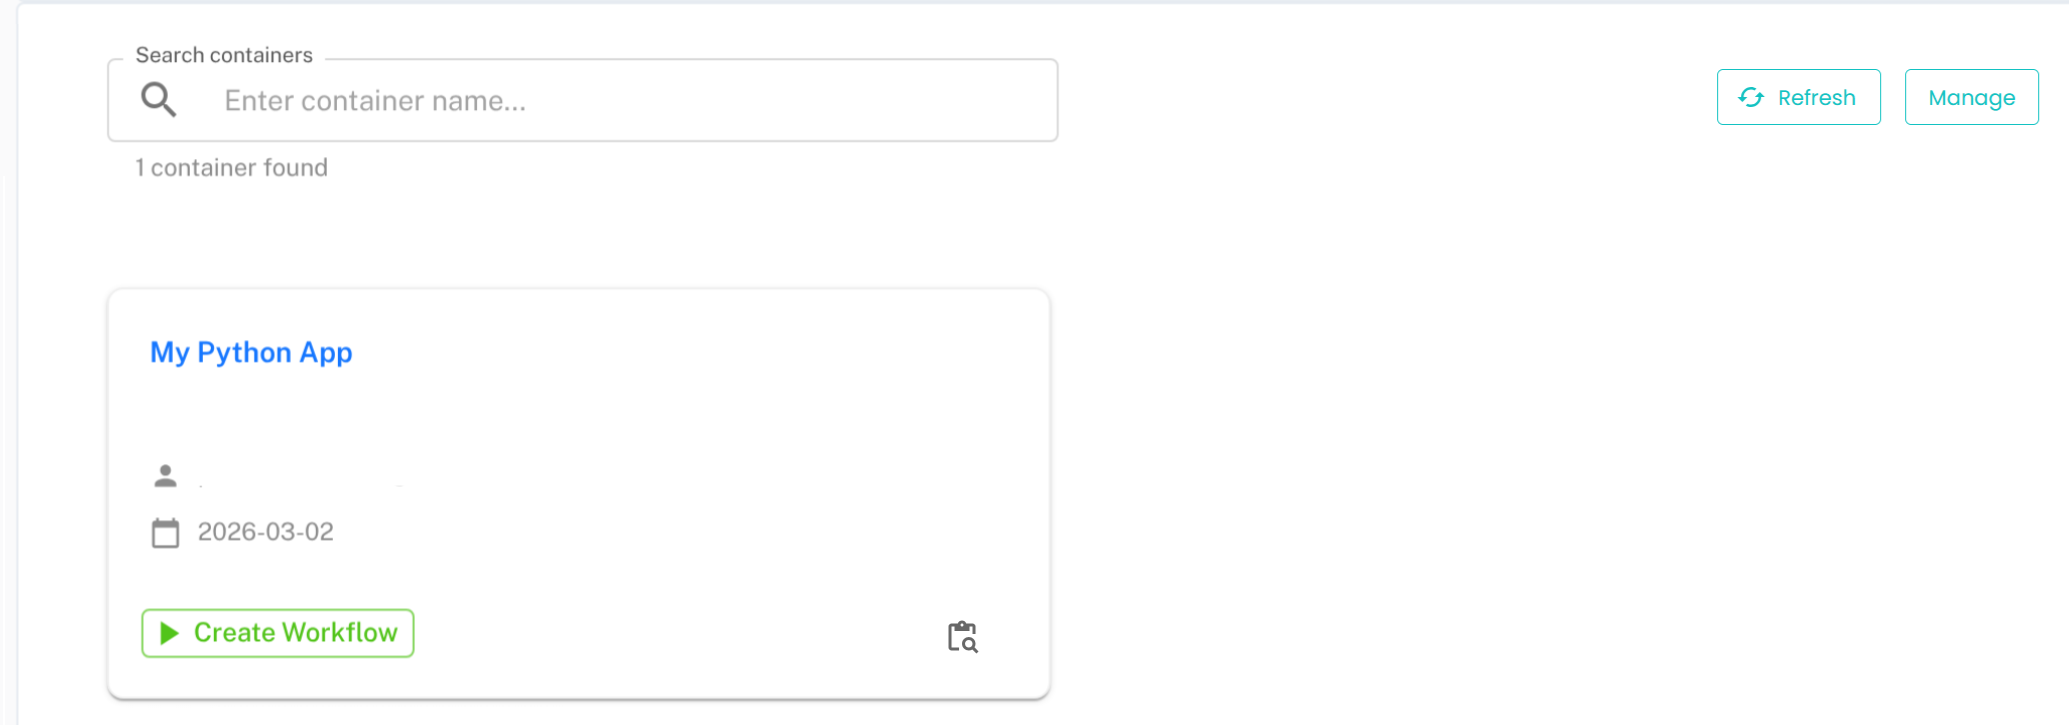
In the Workflows section, you will see all executable objects, including your uploaded container among them. Click on the Container button.

The container will be displayed as a card with basic information. Click Create Workflow on your container’s card to begin.
You will be guided through several steps:
Step 1: Basic Information - Enter a name for your workflow (e.g., “My_Python_Workflow”) and optionally add a description. Click Continue.
Step 2: Execution Environment - Select the execution parameters:
Cluster: Choose the HPC cluster where you want to run the container (e.g., Barbora, Karolina)
Partition: Select the appropriate partition (e.g., qcpu for CPU jobs)
Resource: The LEXIS computation resource assigned to your project
Click Continue when ready.
Step 3: Data Staging - Configure input and output data handling:
Input dataset staging: You can keep this disabled. Enable if you need to work with input datasets from your project. For more details, see the How-to Guide.
Output dataset staging: Enable this to capture output files from your container. Give the output dataset a title. Leave the source path empty to capture all files from the output directory. Optionally, specify a Related Path to organize output files in a subdirectory.
Note
Without output data staging enabled, your container can still write files during execution, but they won’t be automatically captured and will be discarded when the job completes. Only console output (print statements) will be visible in the logs.
Step 4: Parameters default values - Leave this empty or specify command-line arguments of the container as a single string (e.g. “10” for our example). These can be overridden during workflow execution.
Step 5: Advanced settings - Leave these as default and click Continue.
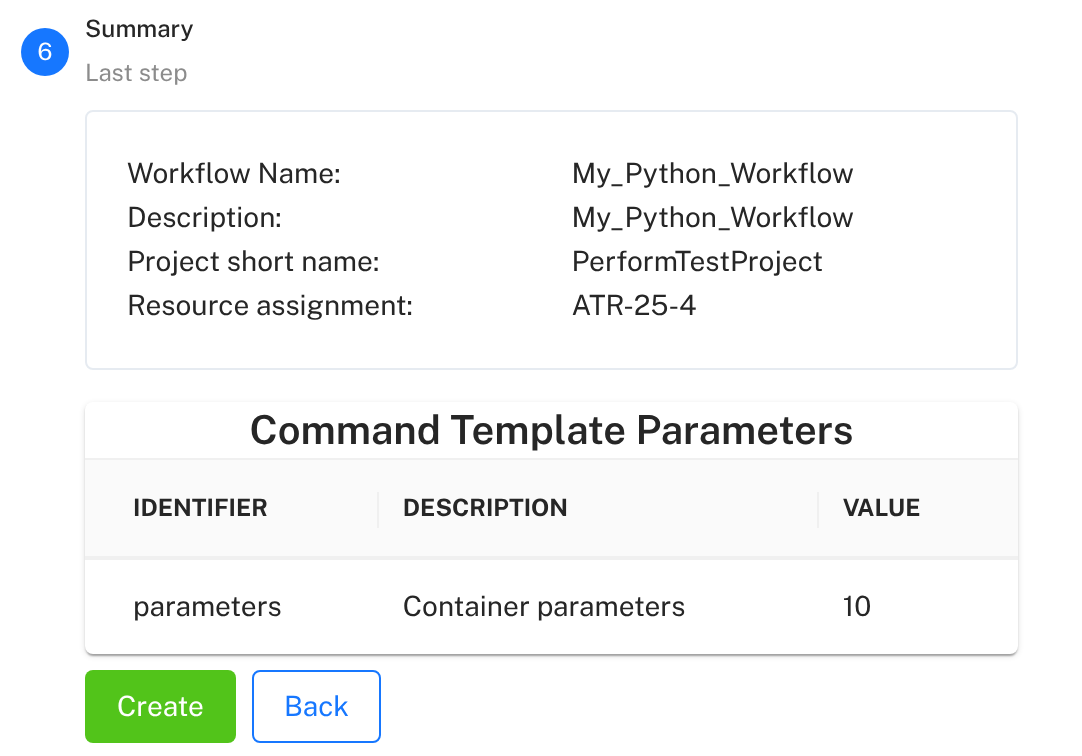
Step 6: Review and Create - Review the summary of your workflow configuration. If everything looks correct, click the green Create button at the bottom.
Your workflow is now created and ready to execute!
Execute Container Workflow#
With your workflow created, you can now execute it on the HPC cluster.
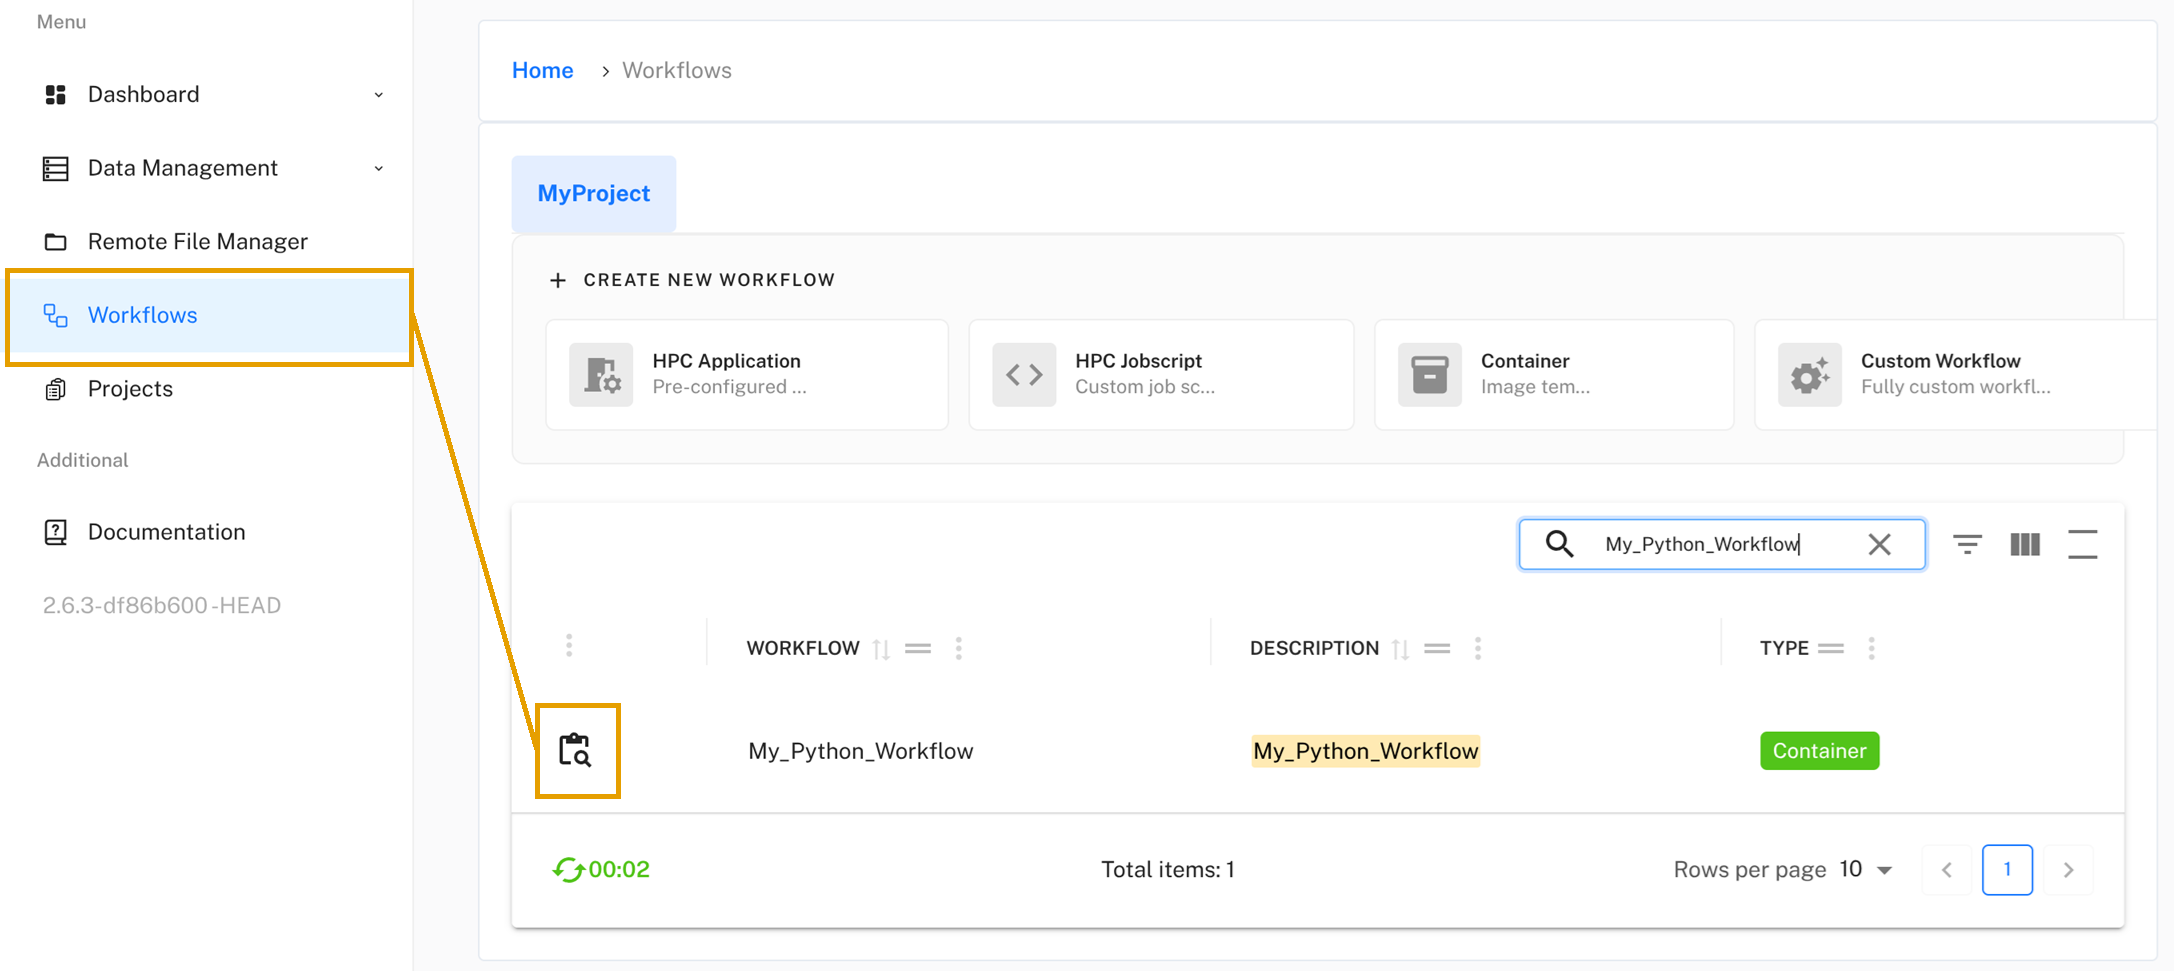
Go to Workflows in the left navigation menu. Find your newly created container workflow in the list and click the magnifying glass icon to view its details. Then click the Create Workflow Execution button. If you cannot see it, wait a moment for the workflow to be fully registered in the system.
Give your execution a name (e.g., “My_Python_Run_1”). You will see the Data Inputs and Outputs that you configured during workflow creation. You can leave the defaults or select different datasets, then click Next.
Since the container accepts arguments, you can adjust them in the Requirements/Tasks/Command Template Parameters field. This allows you to run the same workflow with different parameters each time. When you are ready, click the Create button to queue and run the workflow on the HPC cluster.
View Results#
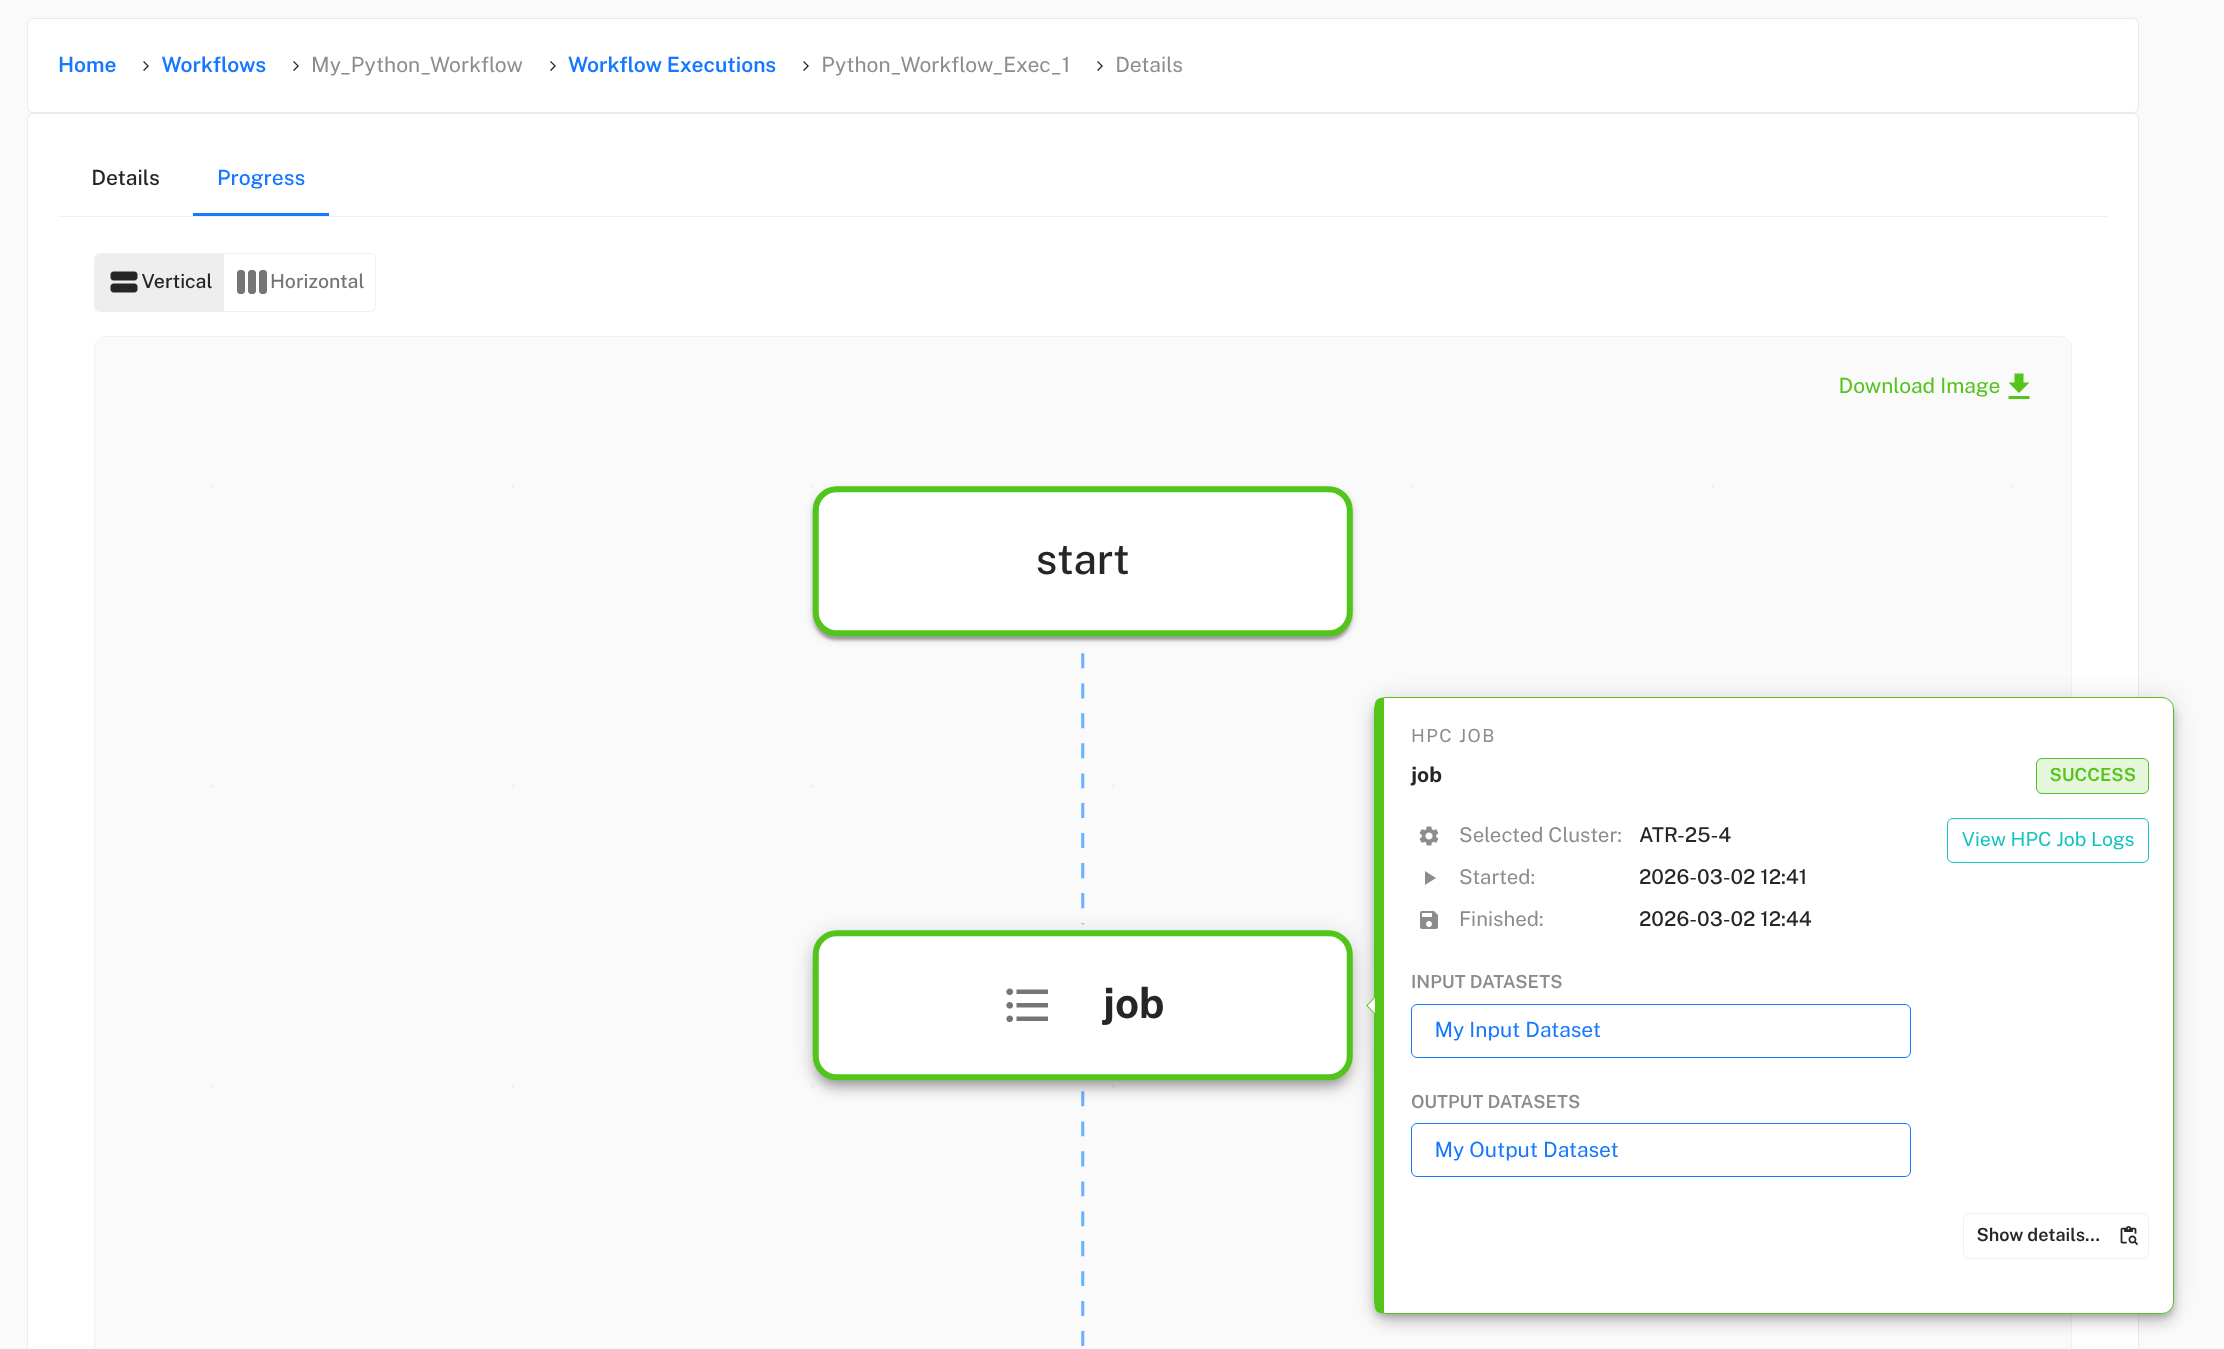
Once your workflow execution completes, you can examine the results. Click the magnifying glass icon next to your workflow execution to view the execution details.

In the execution progress view, hover your cursor over each step to see additional options. We are interested in the job task, which is responsible for running your container on the HPC cluster. You can see the status of the job, input and output data (if staging is enabled), and access execution logs. Click View HPC Job Logs to see the console output from your container execution.
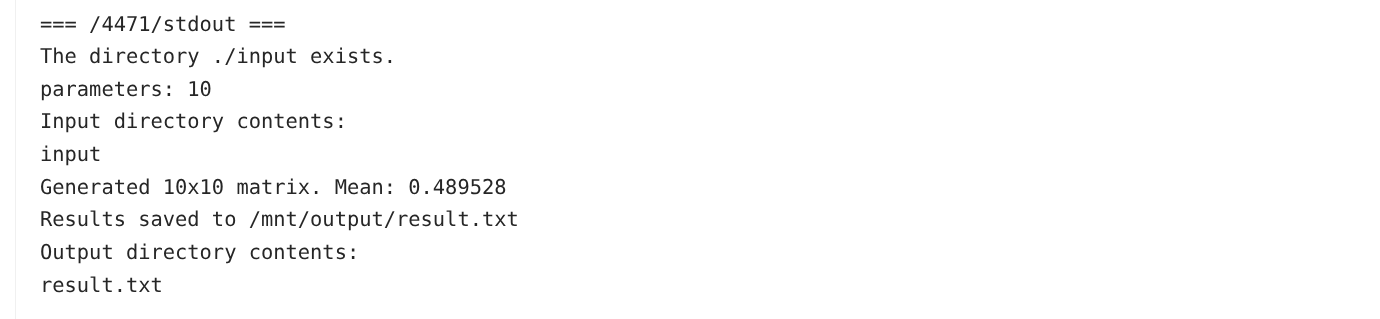
In the logs, you should see the output from your container’s runscript, including any print statements and error messages.
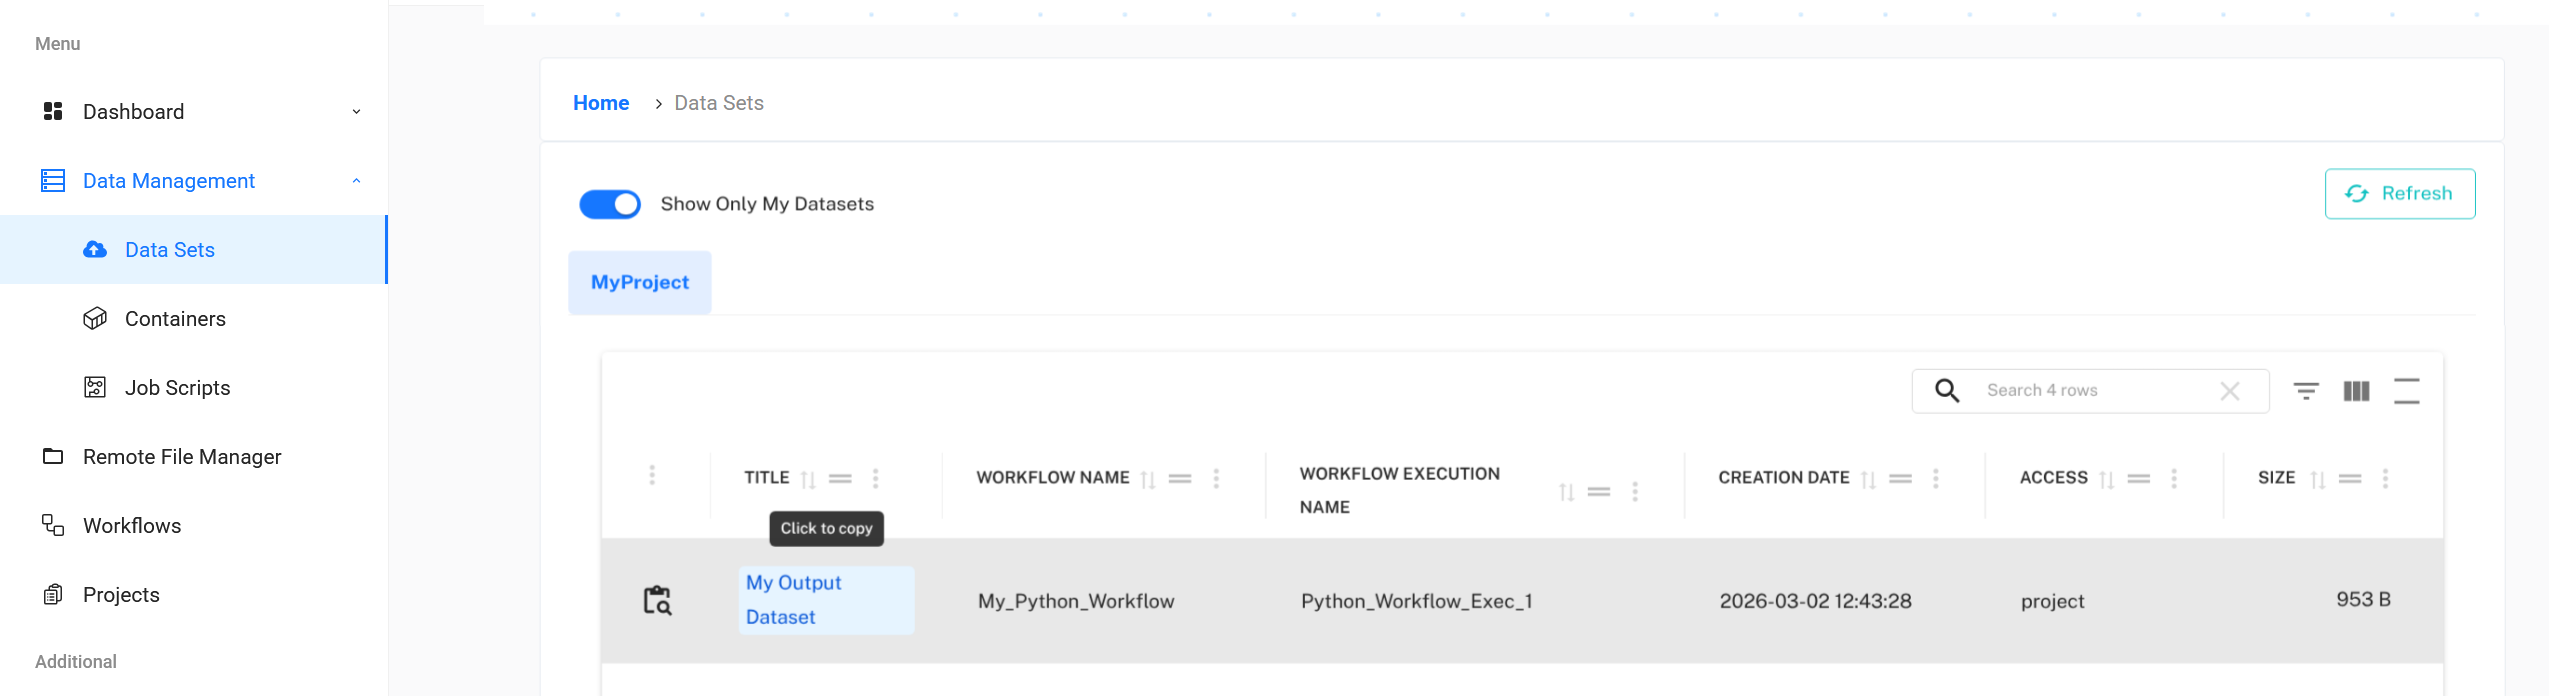
If you enabled output data staging, you can also check the output dataset to see the files generated by your container. You can find it in the Output datasets section of the execution details or by going to Data Management/Datasets in the left navigation menu.
Next Steps#
Congratulations! You’ve successfully run a containerised application on the LEXIS platform. You can now run a new execution of the same workflow with different parameters and input data, or create new workflows with different containers.
To learn more about advanced features, check out:
Creating Datasets: Learn how to upload your own data in Data Management .
Complex Workflows: Or LEXIS Workflows for multi-step workflows with dependencies.